In today’s fast-paced global market, mold design must keep up with evolving industrial needs. As product lifespans shorten, mold makers must innovate to stay competitive. One such innovation is injection molding side action, which revolutionizes the handling of complex geometries and tricky undercuts. In this article, we will explore the function and application of side actions, how they work, and the different types available to optimize your molding capabilities. Our goal is to provide mold makers, designers, and manufacturers with actionable insights to improve precision molding and make informed design choices.
What Is Injection Molding Side Action?
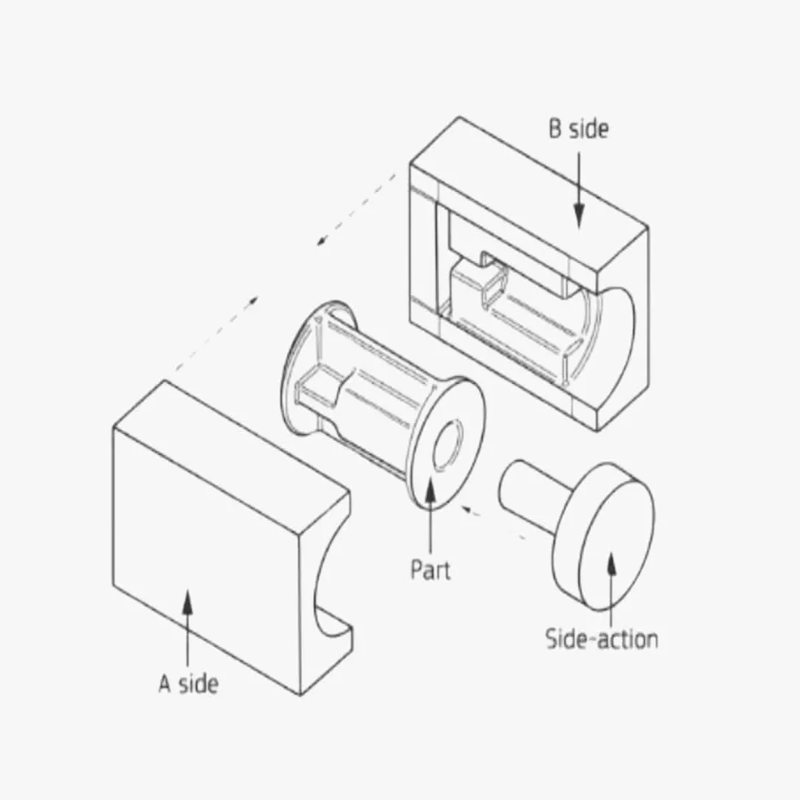
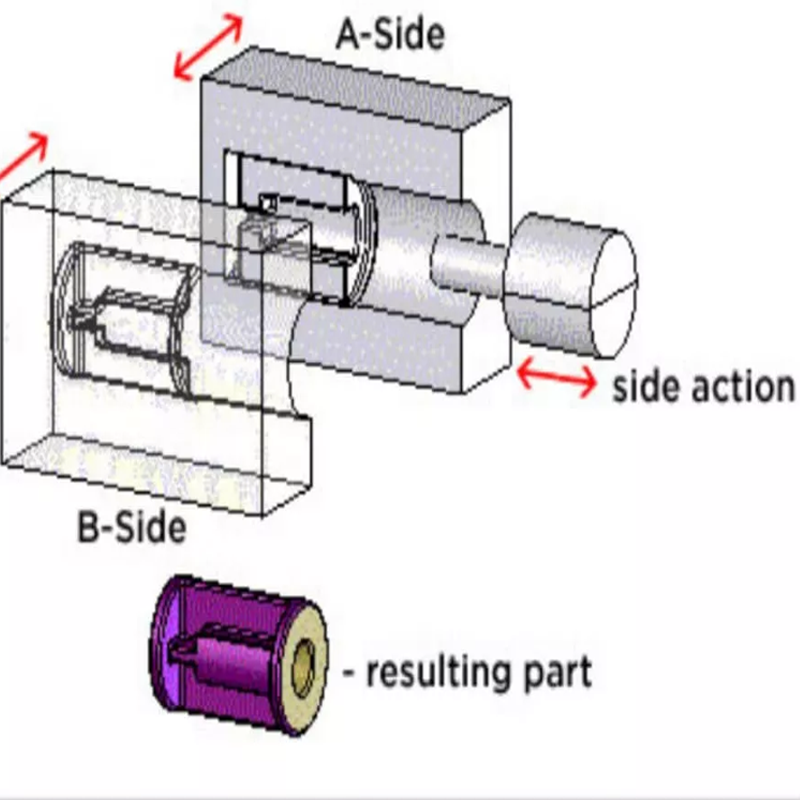
Side actions are specialized inserts that allow for the creation of complex undercut geometries. These features are perpendicular to the mold’s main parting line and cannot be created with a standard straight-pull mold. By incorporating side actions, the mold material can flow around these inserts to form the undercut feature.
Side actions expand the design possibilities for molds by overcoming the limitations of traditional straight-pull injection molding, which cannot release parts with undercuts. Instead, side actions use a cam-driven mechanism that withdraws the mold surfaces during part ejection, ensuring safe removal of parts with complex undercuts.
However, incorporating side actions requires careful consideration. After molding, these inserts must be manually or automatically removed to facilitate part ejection. Designers must determine if side actions are necessary or if alternative design approaches, such as slot features, could achieve the desired outcome.
How Side Action Works
Side actions enable the creation of undercut geometries that traditional molds cannot achieve. Undercuts are characterized by inward-facing angles or projections that complicate part removal without damage.
The side action mechanism works by using lateral movements—slides or cams—that engage with the mold cavity during the molding process. Pins accurately position the side actions to form the undercuts during mold closure. Controlled retraction of these actions ensures smooth ejection without interference, preventing damage to the molded parts.
Hydraulic or mechanical actuators manage this retraction, ensuring seamless operation and high-quality part production with intricate details.
Types of Side Actions
Choosing the right side action is essential for minimizing tooling costs and optimizing mold efficiency. Below are the different types of side actions commonly used in injection molding:
-
Cams
Cams use an angled pin to control the movement of the mold’s surfaces, allowing for precise withdrawal of undercut features. They enable the creation of intricate designs with high accuracy, reducing the need for secondary operations. However, cam pins must be carefully maintained to avoid deformation, which could impact part quality.
-
Lifters
Lifters are used to create and release internal undercuts or features without the need for an angled pin. They offer a simpler design and lower cost but are best suited for less complex geometries. Lifters require careful planning, particularly for features like threads or ribs.
-
Sliders
Sliders are ideal for creating and releasing external undercuts. They can be cam-driven, solenoid-driven, or hydraulic. While sliders are versatile, their design is more complex and requires synchronization with other mold actions for proper engagement and disengagement.
-
Unscrewing
Unscrewing actions are used for creating threaded features. They ensure high precision and prevent damage to the threads. This method is often automated but can be costly and complex, making it more suitable for high-volume production.
-
Collapsible Cores
Collapsible cores are used to create circular undercuts and features. These cores collapse inward to allow for easy removal of both the part and the core. They are ideal for parts with large internal threads or complex geometries.
Design Guidelines for Side Action Molds
Effective side action design requires a clear understanding of the part’s needs and the challenges of the molding process. Here are some key principles to follow:
-
Identify the Need for Side Actions
Determine which features, such as undercuts or recesses, require side actions. Analyze the part design and molding process to decide if side actions are necessary or if alternative solutions may suffice.
-
Design for Manufacturability
Ensure the design accommodates side actions without hindering the molding process. This includes selecting the right side action mechanism (hydraulic, mechanical, pneumatic) and ensuring precise alignment and tolerances.
-
Material Selection
Choose materials that can withstand mechanical stresses, heat, and wear. Consider factors such as strength, hardness, and thermal properties to ensure longevity and durability.
-
Integrate Efficient Cooling and Maintenance
Incorporate cooling channels and thermal management to prevent heat expansion issues. Design the mold with easy access to side actions for quick maintenance, minimizing downtime.
-
Parting Line Management
Carefully plan the placement of the parting line to avoid interference with side actions. Proper timing of side action engagement and disengagement ensures smooth ejection and dimensional accuracy.
Manufacturing of Side Action Molds
The manufacturing process for side action molds involves careful attention to detail at every stage:
-
Design Phase
Collaboration between designers, engineers, and manufacturers is critical. CAD software helps simulate the design and ensure it meets all specifications, including material selection and stress analysis.
-
Material Selection
Choose the right materials for both the mold and side action components to ensure optimal performance. Steel, aluminum, and copper alloys are commonly used.
-
Machining and Fabrication
Precision machining ensures that each component meets tight tolerances. CNC machines and other specialized equipment are necessary for accurate component fabrication.
-
Heat Treatment
Heat treatment processes like annealing, quenching, and tempering enhance the materials’ strength and hardness, ensuring they can withstand the stresses of the molding process.
-
Assembly
Proper alignment and positioning during assembly are essential to ensure the smooth operation of the mold. The final product is rigorously tested to ensure it meets performance standards.
Conclusion:
When selecting a plastic injection mold maker, choose a partner with extensive industry experience and advanced technology. This ensures high-quality molds tailored to your specific requirements and production deadlines.